
One of the first things you should do after choosing a business name is to set up a Facebook business page. But you don’t want to just create the page, you need to know how to maximize the settings to attract clients and customers.
I cover the most important settings and some tips & tricks you can do to make people want to contact you over your competitors.
How to set up a Facebook business page
I have some images for the pages where you can create your Facebook business page, but I won’t be going over every step. Most of the options are easy to understand. Here are some quality links I found that will help you create the page:
1. Facebook For Business: The 1st Facebook link where it mentions that you should have your business name, description, and cover photo ready to go. It also says to have a profile photo, but that should be your logo. So use your personal photo until you get a logo.
2. Create A Page: The 2nd Facebook link takes you directly to create your business page (image below). Obviously, choose the “business” option. The 2nd image below shows the category where you would start typing whatever keyword(s) best fits your business.

3. Create & Manage Pages: 3rd Facebook link that lists the benefits & top features of a Facebook business page.
4. FB Help page: 4th Facebook page that has more in-depth information with links to related topics.
5. Call-to-action help page: And the final facebook link covers CTA buttons (call-to-action). I chose a contact button with the label “Send Email”. This is an easy way for people interested in my services to send me a Facebook message. Choose whichever CTA you prefer.
6. How to create a Facebook Business Page 2020: This is a good article that shows all the steps in creating your Facebook business page. I’m not going to cover each step because I want to cover all the important setup options.
Facebook business page setup
Here is a list of the options after clicking Edit Page Info with a brief description of each (most important IMO in bold text):

1. General: 20 different and important settings.
2. Messaging: Three settings you want to turn on.
3. Page Info: The most important settings, IMO.
4. Templates and Tabs: A listing of the tabs/sections of your page. You can reorder them which you should do. I have the 4 most important as the top ones: Home, Services, About, and Reviews.
5. Event Ticketing: Connect your account to add organizers to this Page.
6. Notifications: Settings for things you want to be notified about.
7. Advanced Messaging: Deals with apps and subscriptions – I skipped this section.
8. Page Roles: Roles for different people who have access to the page. Skip unless you have employees or business partners who will be adding content, responding to messages, etc.
9. Diversity Info: Not applicable to me so I skipped this setting.
10. People and Other Pages: This is for banning someone who isn’t nice. It’s your page so remove any questionable commenters.
* Preferred Page Audience: Skip, no longer available but the link is still active.
11. Issue, Electoral, or Political Ads: Well this is new. It appears FB is a political platform now – I skipped this since I am not a political-based business.
12. Branded Content: Some kind of marketing thing – DO NOT CLICK! You can’t easily get off the page. Wow, FB has really changed.
13. Instagram: Connect your Instagram account to access more features that aren’t available otherwise.
14.. WhatsApp: When you connect your WhatsApp or WhatsApp Business account to Facebook, you can add a WhatsApp button to your Page – I skipped.
15. Featured: Shows pages you have LIKED from your business page, not your personal account. Not sure why this is important.
16. Crossposting: Not important IMO.
17. Page Support Inbox: This is for page support tickets you have submitted to Facebook.
18. Page Management History: This is a history of management actions taken by people who manage this Page.
19. Activity Log: Timeline plus changes to your page – not important, just informational.
Most important setup features
The following are the most important setup features for your Facebook business page. Definitely look into the fields on each of these tabs.
General settings
20 fields that are important to set if they apply to your business.
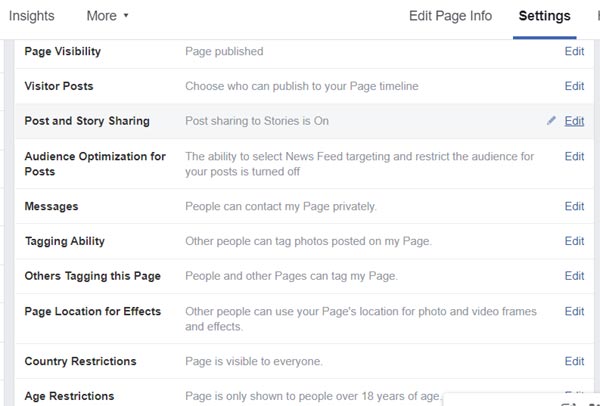
- Page Visibility: Make sure your page is published.
- Visitor Posts: Click the Edit link and select “Disable posts by other people on the Page”. It’s your page and your business. I wouldn’t let other people post ANYTHING that may negatively affect my business.
- Post and Story Sharing: Set to On so that people can share posts that you create.
- Audience Optimization for posts: Newsfeed targeting – leave Off.
- Messages: Click Edit to turn the feature on for people to contact you privately.
- Tagging Ability: Turn on for people to tag your photos and videos.
- Others Tagging this Page: Allow people to tag your page.
- Country Restrictions: Leave blank so that anyone from any country can view your page.
- Age Restrictions: With the recent COPPA thing, I set this to 18 years or older. No one under 18 will hire me plus they probably aren’t interested in my page anyway.
- Page Moderation: To block posts with certain words. No need if you set the profanity filter below.
- Profanity Filter: I set it to Strong. It’s my business and I don’t want anyone commenting with profanity on MY page.
- Similar Page Suggestions: Check the box on this one so that your page is included in Recommended pages.
- Page Updates: Not sure what it is but I checked the box for this one.
- Post in Multiple Languages: I skipped this one but you may want to check this one if it applies to your business.
- Translate Automatically: Turn this On.
- Comment Ranking: Turn it On.
- Content Distribution: I left this unchecked which means people can download my images.
- Download Page: Not important.
- Merge Pages: Not sure why you would do this unless you set up your tabs wrong.
- Remove Page: This is to DELETE your page – don’t do it unless you do not want the page anymore.
Page Info
There are 8 important fields and settings for this tab:
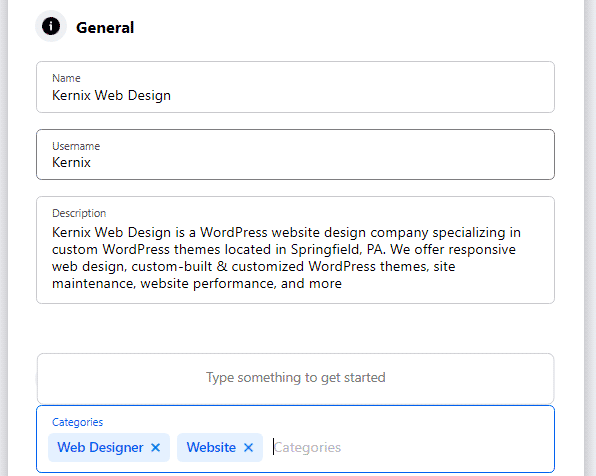
- Description: Write a succinct description of your business
- Categories: Start typing your main keywords for your business and select the categories that apply to your business. I chose “Web Designer” and “Website”.
- Phone Number: Make it easy for potential clients to contact you by adding your phone number here.
- Website: Add the home page of your website here or leave it blank if you do not have a website yet.
- Email: Enter the email address for people to contact you. Don’t use your personal email. Get a second Gmail account for this.
- Address: Enter your business address if you have one or a home address even if you do not have plan on having clients in your place. Skip this if you are uncomfortable putting that information on the internet.
- Service Area: If you don’t add your address, then definitely add the neighborhood or city of your service area.
- Hours: Set the hours that you are available. Set each day individually if weekends are different than weekdays.
Messaging
I set the following options to “On”
- Use the Return key to send messages: This sets the ENTER key to send the message.
- Help people start a conversation with your Page: I turned it on.
- Starting a Messenger Conversation – Show a greeting: “Hi ‘username’! Thanks for getting in touch with me on Messenger. Please send me any questions you may have.” This is just an example of an automatic greeting after someone sends you a message.
Notifications
I turned all options “On” and chose the following option:
Get a notification each time there is activity on your Page or an important Page update. This is the first option under the heading “On Facebook”.
Obviously, turn off any option that you do not want to be notified about.

But the most important section is under Services List > Show Services. I added 3 services: Web Design, WordPress Theme Development, and WordPress Setup and Configuration. I then added a brief description and the rates for each (see image above).
Tips to get the most out of your page
Here are 10 important tips to get the most out of your Facebook business page:
1) Pin an informative post to the top so that it is the first post first-time visitors will see. This is another work-around for the free business page Facebook offers.
2) Fill out the About page: This is where people can see where you are located, business description, hours, email address, website link, and more.
3) Services tab: I can’t stress enough how important this is.
4) Consider creating a video. This makes you a real person and shows your experience.
5) Write posts for your page and include great photos and graphics. If you have a website with a blog, then you can share them on your page. Otherwise, create posts just for Facebook.
6) Contact me, Share, Like, etc: Pick the call-to-action that you feel would be best for you. I prefer the Contact Me option.
7) Create a Facebook group related to your business.
8) Client reviews! You have to get your clients to give you 5-star reviews on Facebook. Bribe them if you have to.
9) Use your business name in your URL: You can set this up when you create your page. If you already created one, go to Page > About > and click Edit next to the username field. Then change and click create a username. I think you can only do this one time so choose wisely.
10) Reorder the Tabs so your preferred tabs are not hidden in the More drop-down list.
Final Thoughts
Don’t wait. Make creating a Facebook business page for your business a top priority. Let it work for you while you are busy with your business. Take a look at my article Website Business Name article for more insights.