You need to learn markdown if you have or contribute to repositories on websites like GitHub, or for forums and learning sites like freeCodeCamp. Specifically, you need it for creating and editing README and other documentation files.
In this Markdown cheat sheet, I will show you the basic Markdown syntax to create your first README.md files followed by some intermediate and advanced syntax to make your repos look professional.
Basic Markdown
If you found this article then you already know what markdown is and that you need to learn it. I will not cover what it is, why you need it, who invented it, etc. Let’s get into it.
Below are some of the most common styling that you would want in your README files. Consider cloning or forking my markdown-cheatsheet repo on GitHub to see examples of what you can do.
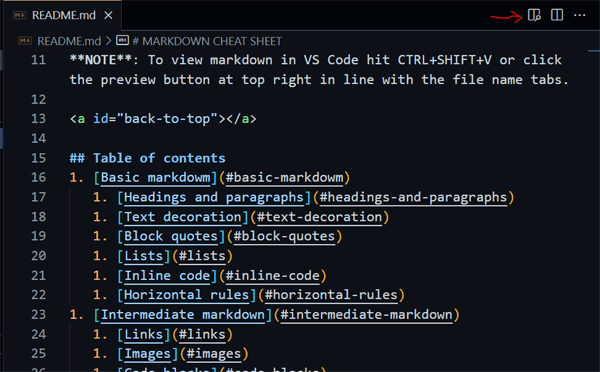
By the way, you can preview markdown in VS Code without an extension, although some markdown does not display such as footnotes. Look at the red arrow in the image below – just click on that. It helps to toggle the sidebar and been reduce the markdown file.
Headings and paragraphs
Paragraphs are just regular text with 2 line breaks needed between each paragraph and other elements.
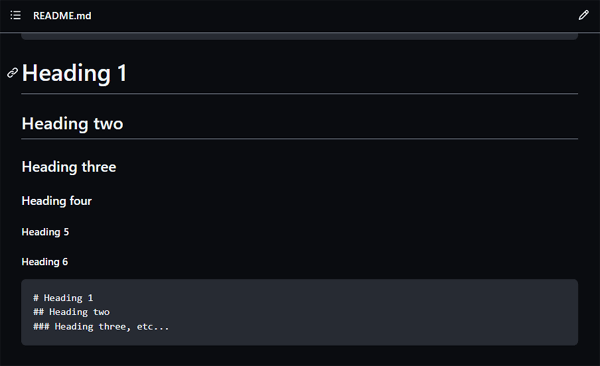
There are 6 heading sizes in markdown like there is in HTML, though I never use h5 or h6 for my pages. You just use 1 through 6 hashtags for heading1 through heading6.
NOTE: There is an automatic horizontal rule added when you use syntax for H1 and H2.
# Heading1## Heading2### Heading3
Blockquotes
This would be useful to quote someone you are contributing with. Use a greater than sign (>) to show a blockquote. Use 2 for nested blockquote but who does that?
> This is a quote>> Try an empty line like above>> > Or use a nested blockquote
Bold text
Use either 2 asterisks or 2 underscores before and after the text for bold styling. The preferred syntax is to use asterisks for bold: **bold text** or __bold text__.
Italic text
Use a single asterisk or underscore before and after text to display it as italic. The preferred syntax is to use an underscore for italic: *This is italic text* and _So is this_.
Bold & italic text
Use either 3 asterisks before and after the word(s) or 2 asterisks and an underscore:
***This is bold and italic text*****_This is ALSO bold and italic text_**
Strikethrough text
Use two tildes (~~) before and after the text you want to display as strikethrough. I have never used strikethrough but maybe you do:
~~Strikethrough text~~Horizontal rules
The way I prefer to make a horizontal rule is with 3 dashes with a space between them, but you could use 3 dashes without a space or 3 asterisks with or without spaces:
- - ----* * ****
NOTE: Make sure to hit ENTER twice if you intend to use 3 asterisks without spaces or it will set the text above it to an H3 tag.
Inline Code
You can use code in a sentence and highlight it by using a single backtick before and after the code such as <div class=”row”>:
`<div class="row">`Code blocks
For multi-line code blocks use 3 backticks before and after the code block:
        ```
        pre span {
          display: inline-block;
        }
        ```
External Links
Links have 2 parts to them with an optional parameter. The link text goes between square brackets [ ], and the URL goes inside parentheses ( ). You can also add a title for the link that will display when a user hovers over the link. To do that you would and a space after the URL and then inside a set of double-quotes add a link title:
[Kernix Web Design](https://kernixwebdesign.com 'Home page')Anchor links
By “anchor” links, I mean links that go to a section of the page as opposed to another page or website.
This can be done in at least two different ways. For all the links in the table of contents in my repo (see link at top), I use the easy method. But for the Back to Top link, I use an actual <a> tag.
You need to use the same syntax of square brackets and parentheses for links with both methods: [Link text](URL).
The first method is to add an empty <a> tag with an id attribute that matches the hashed URL link:
<a name="top_anchor"></a>[Back To Top](#top_anchor)
The second method is more common especially for table of contents links in README files. You put the exact text that you want to link to in the square brackets with the same case. In the parentheses you start with a hash symbol followed by the exact text all in lowercase and connected with dashes:
[Exact words in target link](#exact-words-in-target-link)Images
The syntax for an image is identical for a link with the exception of adding an exclamation mark (!) before the opening square bracket. Also, replace the link text with alt text:
Lists
You can use either an asterisk or a dash followed by a space to make a bulleted list. I prefer using a dash since you do not need to use the SHIFT key. For nested lists, use the SPACEBAR key to align directly beneath the first character in the parent list item to create a nested list:
    - List item one
    - List item two
      - Child item one
Use a number followed by a period (1., 2., 3. etc.) to create an ordered list. For a nested ordered list, do the same as for nested unordered lists – align the number to be below the first character of the parent item.
    1. List item one
    1. List item two
        1. Child item one
NOTE: By using “1” for each list item, you can cut & paste to change the order of items and the numbering will change to match the new order.
More advanced Markdown
Use the following markdown syntax for “fancy pants” markdown files.
Code blocks with code highlighting
A really nice feature for code blocks is to have basic syntax highlighting by adding the language after the first set of triple backticks. Here are the languages I have tested but check out my repo for examples: md, html, css, js, json, php, sql, xml, svg, python, apacheconf, …
```css
    pre span {  display: inline-block; } ```
I did not create any CSS to show you the styling for most of the fancier markdown features so check the repo to see what it looks like.
Diff code blocks
These are really nice for highlighting changed values and the new values. Use diff after the opening triple backticks, then a minus sign (-) and space for what was changed, and a positive sign (+) and a space for the new text/code.
```diff- this code or text is the old version+ this is what it was changed to```
Comments
This is a nice way to add a comment in the editor view of your markdown file. This would be good for teams members editing a documentation page for a new section. The best way is to use HTML syntax:
<!-- HTML comments work best IMO -->Tasks
You can create what looks like checkboxes and display completed tasks with a checkmark. It takes the form of an unordered list with the first characters being a set of square brackets [ ] which MUST have a space in them. For a completed task, add either a lower or uppercase “X” inside the square brackets [x].
- [ ] incomplete task- [x] completed task- [ ] incomplete subtask- [x] completed subtask
Tables
I only used this for the Pull Requests and Issues I opened on freeCodeCamp. That table is a list of common prefixes to include in your titles (check out my Beginner Git Commands repo). Here is a generic table.
Pay attention to the syntax that is creating the column divisions and alignment. The pipes create the columns and the colons determine the alignment.
    | Left aligned | Center aligned | Right aligned |
    | :----------- | :------------: | ------------: |
    | Content Left | Content Center | Content Right |
    | Content Left | Content Center | Content Right |
    | Content Left | Content Center | Content Right |
    | Content Left | Content Center | Content Right |
Footnotes
I assume footnotes would be useful in a very technical or long README file. Use square brackets where you want a footnote link to appear and use a caret symbol (^) followed by the number of the footnote. Then below that area add the same syntax followed by a colon and the note itself. That will make the footnote text appear at the bottom of your file.
Here is what your text with the footnote syntax will look like:
Footnote.[^1]Another footnote.[^2]
Here is the syntax for the actual footnote:
[^1]: This is footnote number one.[^2]: Here is the second footnote.
Final Thoughts
There is a lot more you can do with your markdown files like actually using HTML tags. I have seen <a>, <p> and <span> tags in profile MD files, but I have not done much research into what you can and cannot use. I have also seen videos in markdown files so that would be something to look into for your GitHub profile.
Also note that all the syntax can be used in Discord and Slack, though slack has editor buttons for them, whereas Discord does not. I also see markdown used in forums and support tickets for some websites and hosting companies.
Here are some additional links that you can use to build your own Markdown cheat sheet:
- Daring Fireball: Check out the Markdown Basics and Syntax tabs.
- Complete list of github markdown emojis
- GitHub emoji list
Here is a markdown cheat sheet in table version (basic code only):
| Format | Syntax |
|---|---|
| H1 | # |
| H2 | ## |
| H3 | ### |
| H4 | #### |
| Italics | *italics* |
| Bold | **Bold** |
| Strike thru | ~~strikethrough~~ |
| Horiz. Rule | – – – |
| Block quote | > text here |
| Links | [link text](domain.com) |
| Anchor link | [Exact text](#exact-text) |
| Footnote link | [^1] |
| Footnote text | [^1]: text here |
| Image |  |
| Comment | <!– comment –> |
| Unordered list | – List item * List item |
| Inline Code | `insert code here` |
| Code block | 3 backticks |